Due to the interconnected nature of Kubernetes, embracing Kubernetes security involves some unique considerations. Everything in Kubernetes is interconnected, so you can’t fully understand a Kubernetes deployment without thinking about what components are connected within the deployment. For example, you can’t have an application without a deployment and a few pods attached to some kind of ingress.
Understanding the connections between components is a critical first step to maintaining Kubernetes security. The next step involves adopting Kubernetes security scanning tools like Checkov, the leading open-source infrastructure-as-code (IaC) security scanner.
With Checkov, you can implement important Kubernetes security best practices and adopt an approach to securing your Kubernetes workloads that accounts for the connections between Kubernetes resources, such as enabling queries across objects with graph checks.
Checkov’s graph checks for Kubernetes are similar to other graph checks for different frameworks. For example, CKV2 checks in Terraform enable you to write checks across multiple objects, such as a check to ensure that an EC2 instance has a security group attached to it. By writing graph checks in Kubernetes with Checkov, you can improve your Kubernetes security by enforcing policy-as-code for your workloads across multiple resources.
Let’s walk through the underlying problem that graph checks solve and how Checkov approaches graph checks in Kubernetes. Plus, we’ll dive into a quick tutorial to show you how to leverage Checkov graph connections to secure your Kubernetes workloads!
Siloed Resource Checks Result in Incomplete Kubernetes Security
Traditional security scanning tools only scan individual, siloed resources. While this may not be a problem at first, as you scale and begin scanning resources in even moderately-sized cloud environments, you’ll quickly get overwhelmed by noisy and duplicative alerts.
All these noisy alerts require that you manually sift through false positives to ensure you’re seeing the important alerts through the noise, which is time consuming and inefficient.
And there are situations in which your security scanner may not alert on a serious issue because the connection between components within your system introduces an attack path that the scanner can’t pick up on. Let's look at an example of how this can happen.
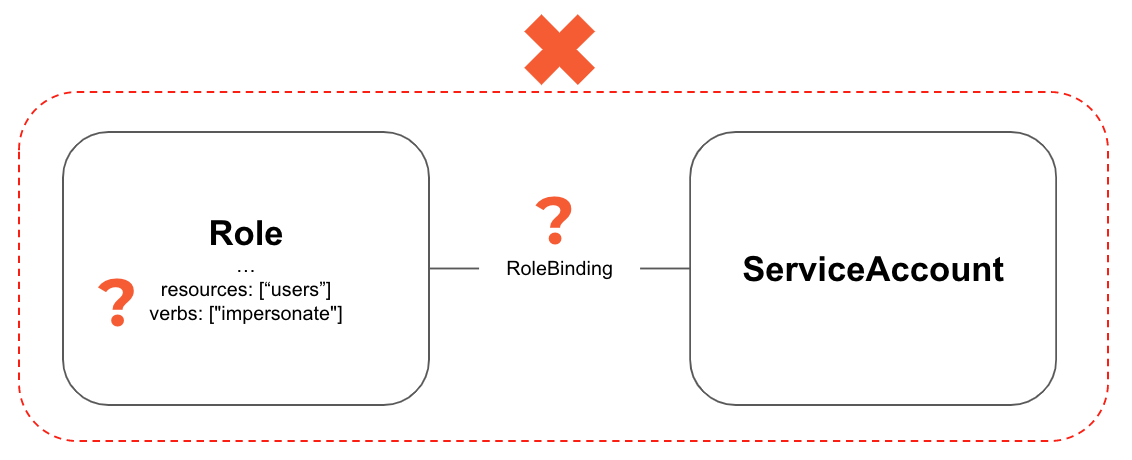
In the scenario above, a Role with the impersonate verb is not inherently bad. It can be used for debugging and testing. But if that Role is attached to a ServiceAccount, that ServiceAccount becomes much more valuable as an attack path. Now, if that ServiceAccount is compromised, it can be used to impersonate a user and use those permissions to escape much of the security isolation in Kubernetes.
Reduce Alert Fatigue with Checkov’s Graph Connections
To mitigate siloed resource scanning and reduce noisy alerts, Checkov leverages a graph database. Graph databases ensure that all data points — also known as resources — created by Checkov are interconnected by relevant metadata. Instead of a policy querying a single datapoint or resource, the whole graph becomes the target of the policy. This allows us to take the complexity of “context” from the Checkov user end and embed it into our checks.
According to Gartner, “Graph technologies act as a glue and multiplier by covering connections between all data and delivering value in areas such as healthcare management, clinical research, and the healthcare supply chain.” Extending the use of graph technologies to other supply chains, such as software supply chains, is a natural next step in the use of this technology.
How Do Checkov’s Graph Connections in Kubernetes Work?
Let’s look at an example to see why these connections are so important for Kubernetes. In Figure 2, we have a simple Kubernetes deployment that’s exposed via a LoadBalancer.
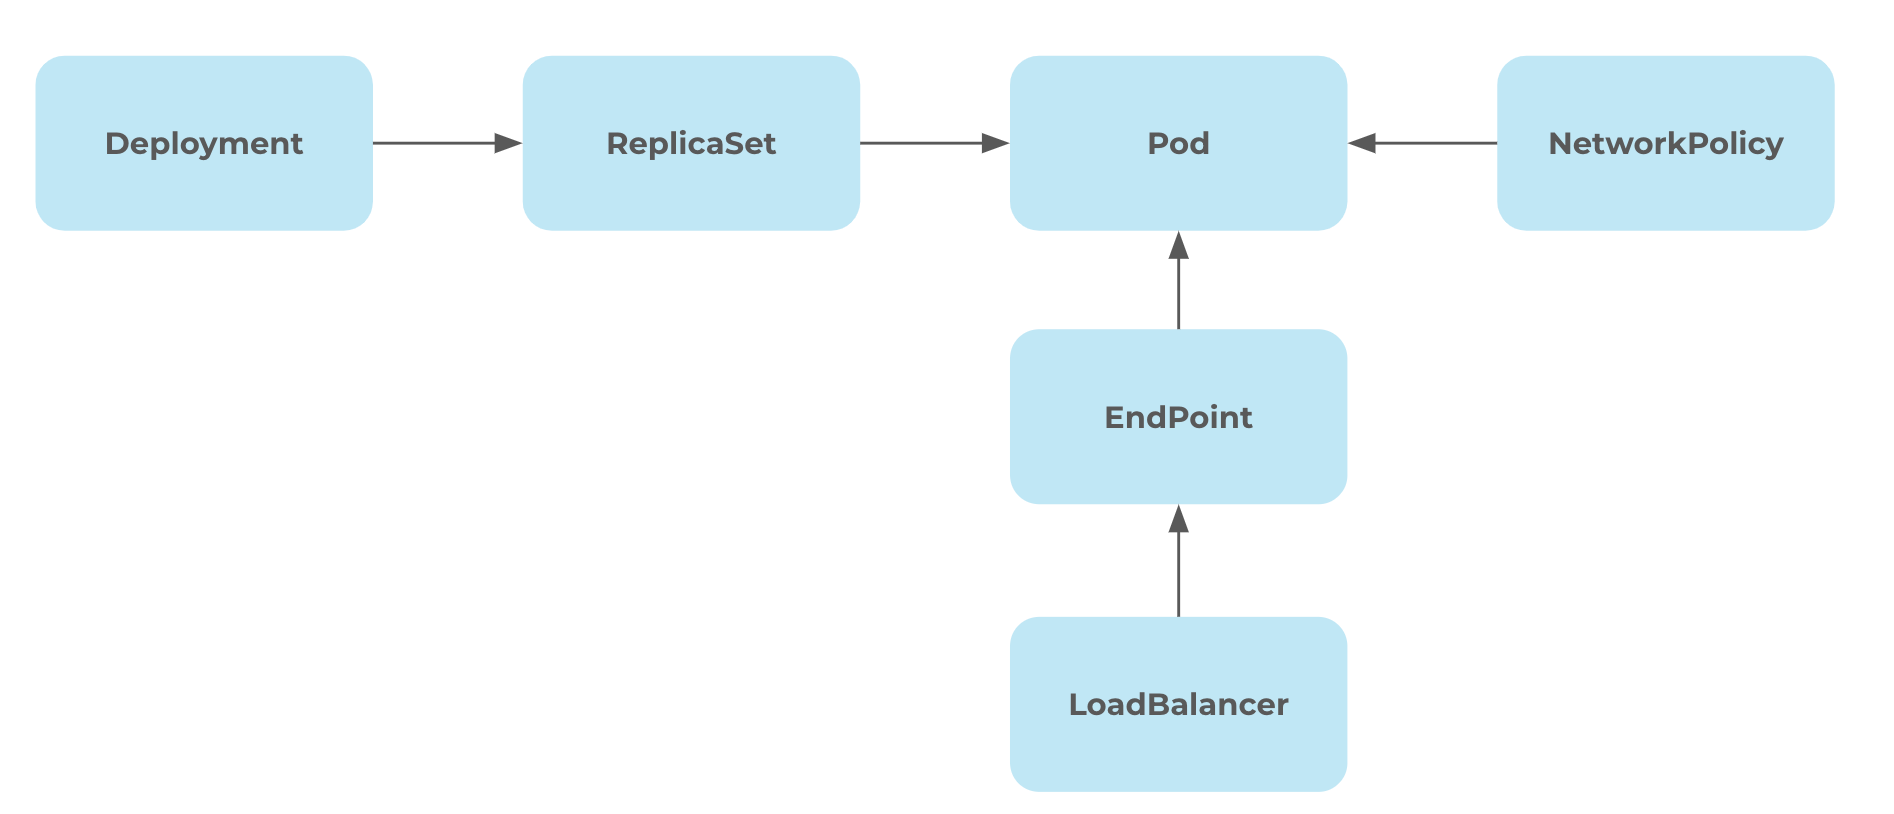
Here we see six unique objects. There is a deployment that includes multiple pods via ReplicaSet. The connection between these pods is governed by the NetworkPolicy. Additionally, the pod has an exposed API via the LoadBalancer.
The relationships between these resources create the application deployment. No resource — or datapoint within the graph — in this chain can be manipulated individually without losing context.
If we just look at the deployment, we can’t determine if the LoadBalancer or network policy are correctly configured. We need to follow these connections and treat the connections as a whole to determine if the configurations are correct.
This is where graph connections in Checkov and Prisma Cloud come in.
With policy contributions from the threat researchers at Unit42 by Palo Alto Networks, we’ve extended the graph capabilities of Checkov — which previously only supported Terraform and CloudFormation — so that Checkov now builds an internal graph of Kubernetes objects across any scanned manifests and can find relationships via Kubernetes selectors, as well. This internal graph enables you to quickly understand and write effective Checkov policies for your Kubernetes workloads.
Using Graph Connections for Kubernetes in Checkov
As of Checkov 2.2.264, the new graph connections will be formed by default and will enable new out-of-the-box and custom policies to traverse between objects and trigger relevant policies.
For example, NetworkPolicies help restrict traffic to and from pods. These policies are powerful tools to prevent lateral movements in attacks. But having a NetworkPolicy isn’t helpful unless it’s attached to a pod. The built-in CKV2_K8S_6 policy uses graph connections to alert for any pods — and deployments, which create their own pods — which don’t have an attached NetworkPolicy object.
Let’s see how easy it is to define one of these policies with the example below.
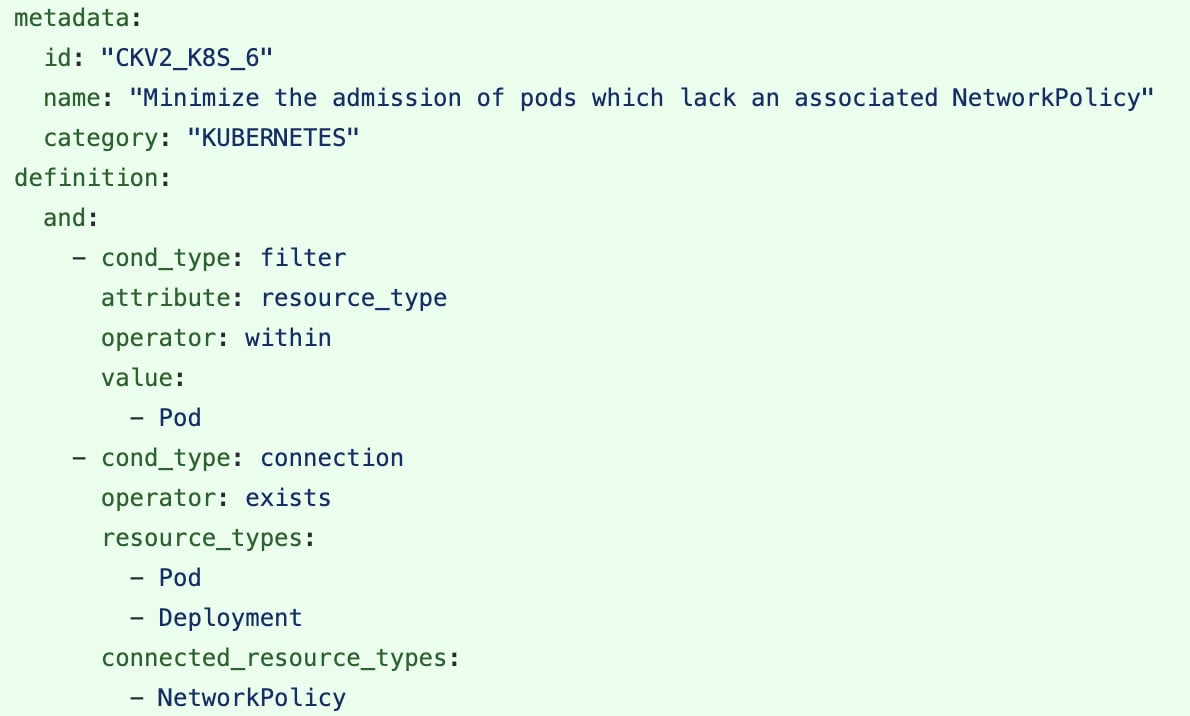
This policy is defined to look for a connection between either a pod or a deployment and a NetworkPolicy. The filter block focuses the violation on the pod rather than the NetworkPolicy because the connection is bidirectional. You can install Checkov and test out this policy against your own Kubernetes manifests with the following Checkov command:
checkov --framework kubernetes --check CKV2_K8S_6 -d ~/your/manifests/dir
Or, you can test all our out-of-the-box Kubernetes policies with the following command:
checkov –framework kubernetes -d ~/your/manifests/dir
We also have a free GitPod online sandbox that you can use to test these policies.
Once you’ve tested the policy, let’s run the following commands in the terminal:
# Install the latest version of Checkov.io
pip install checkov
# Clone our sample vulnerable-by-design Kubernetes manifests
git clone https://github.com/bridgecrewio/kustomizegoat.git
# Run the specific Checkov graph policy above
checkov --framework kubernetes --check CKV2_K8S_6 -d /workspace/checkov/kustomizegoat/
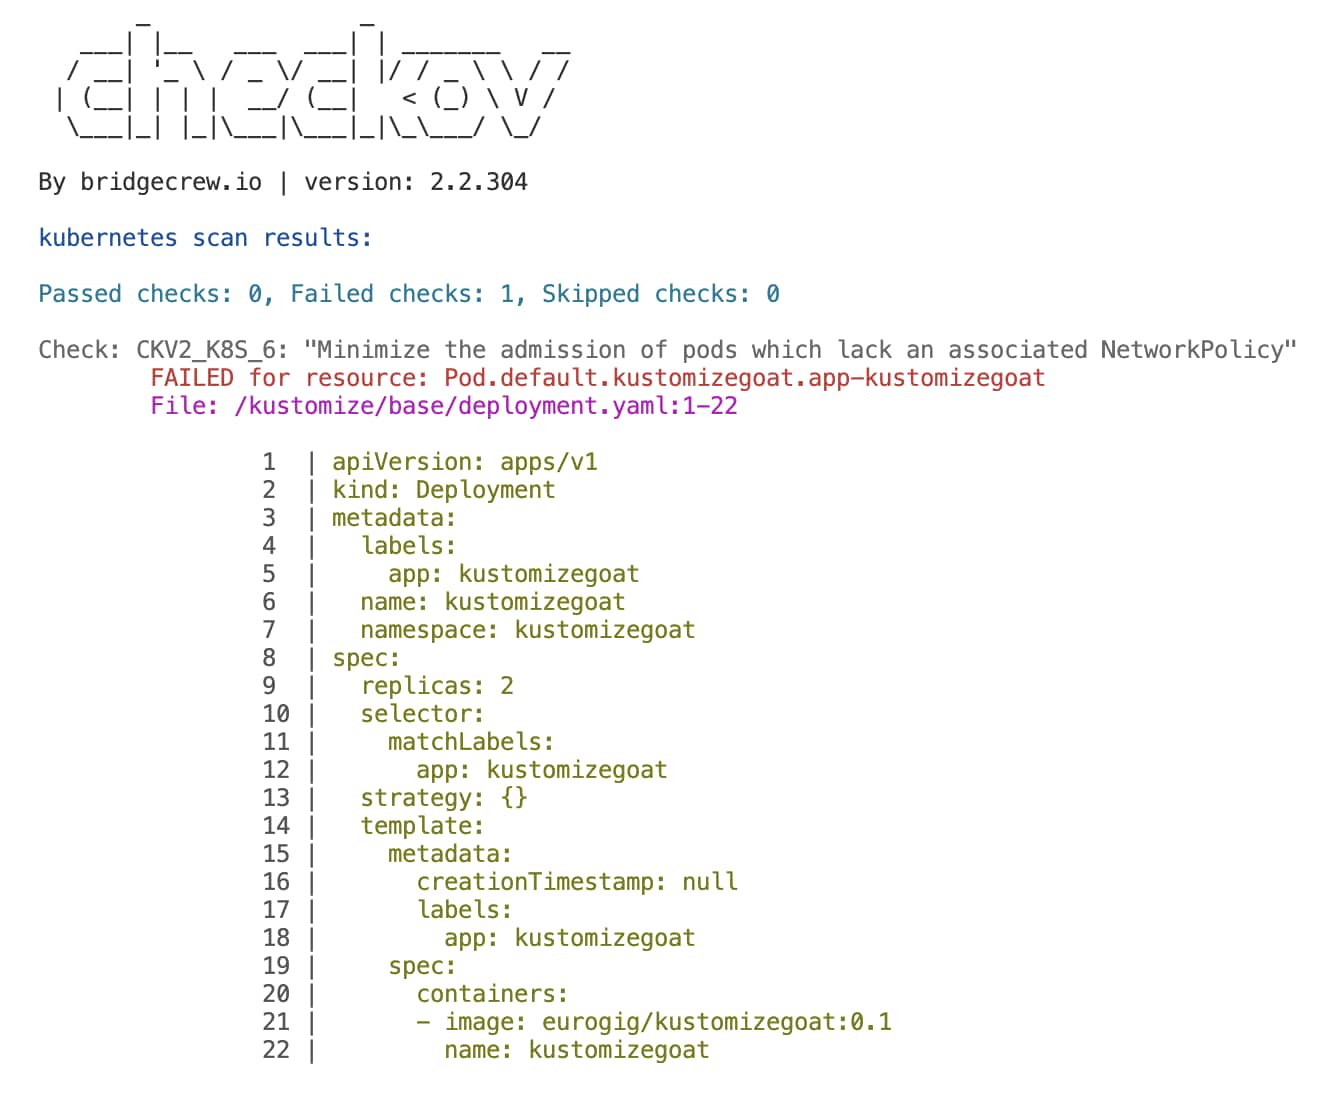
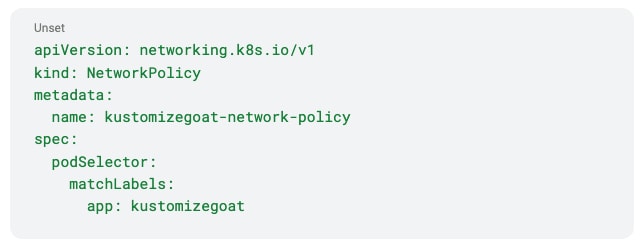
Here we can see a deployment called KustomizeGoat that has no NetworkPolicy attached. If there was a NetworkPolicy as defined in Figure 5, then Checkov would recognize that the deployment has an attached NetworkPolicy and therefore would pass the check.
Checkov Powers More Contextualized Findings in Prisma Cloud
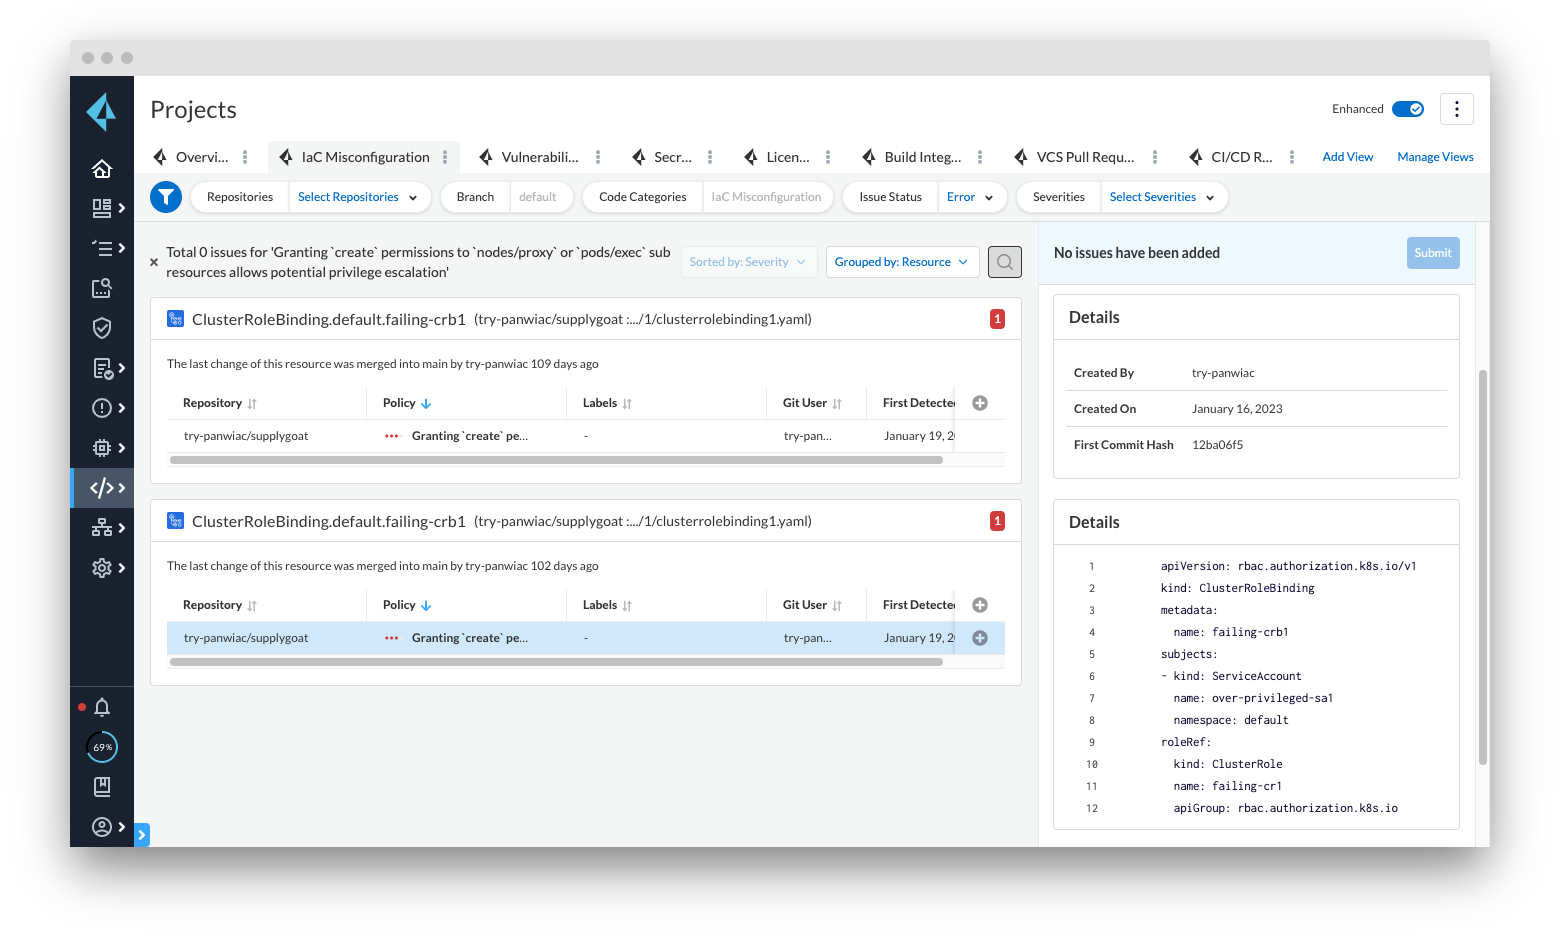
Checkov’s graph checks power Prisma Cloud’s ability to generate more accurate findings and display them in the Projects screen. The graph checks in Prisma Cloud are available both as out-of-the-box and as custom policies, which enables you to add custom graph checks that are unique to your environment or organization.
Enriched Context with Checkov’s Graph Checks for Kubernetes
Checkov’s new Kubernetes graph connections extend the support already provided for Terraform and CloudFormation to Kubernetes, Helm, and Kustomize manifests. With graph checks, you can leverage enhanced context and visibility to reduce noisy alerts, better understand your risk profile, and protect your Kubernetes workloads from complex attacks.
Learn More
If you want to try Checkov for yourself, read Checkov’s documentation to get started. And if you’re looking to level up your Kubernetes security knowledge, download the DevSecGuide to Kubernetes.