Welcome back to our blog series where we reveal the solutions to LabyREnth, the Unit 42 Capture the Flag (CTF) challenge. We’ll be revealing the solutions to one challenge track per week. Next up, the Windows track challenges 1 through 6, followed by 7 through 9 next week.
Windows 1 Challenge: Deez bugs are bad bugs.
Challenge Created By: Richard Wartell @wartortell
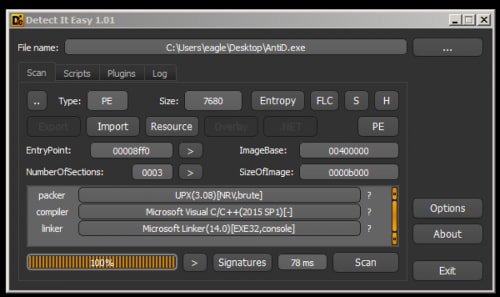
We are given a PE file that we open in DetectItEasy and see that it is packed with UPX.
We can try and unpack it with upx –d, but it couldn’t be that easy.
|
1 2 3 4 5 6 7 8 9 10 |
upx -d AntiD.exe Ultimate Packer for eXecutables Copyright (C) 1996 - 2013 UPX 3.91 Markus Oberhumer, Laszlo Molnar & John Reiser Sep 30th 2013 File size Ratio Format Name -------------------- ------ ----------- ----------- upx: AntiD.exe: CantUnpackException: file is modified/hacked/protected; take care!!! Unpacked 0 files. |
It looks like we will have to unpack this ourselves before we can solve it. UPX uses the pushad instruction at the beginning to push the registers on to the stack so that it can retrieve them after unpacking and jumping to the original entry point. We can script IDA’s debugger to set a hardware read breakpoint at the location of the pushed registers on the stack to get us close to the OEP.
|
1 2 3 4 5 6 7 8 9 10 11 12 13 14 15 16 |
import idc import idaapi import idautils idc.AddBpt(ScreenEA()) idc.LoadDebugger("win32", 0) idc.StartDebugger("", "", "") idc.ResumeProcess() idc.GetDebuggerEvent(WFNE_SUSP, -1); address = idc.GetRegValue('ESP') - 1 idc.AddBptEx(address, 1, BPT_RDWR) idc.ResumeProcess() |
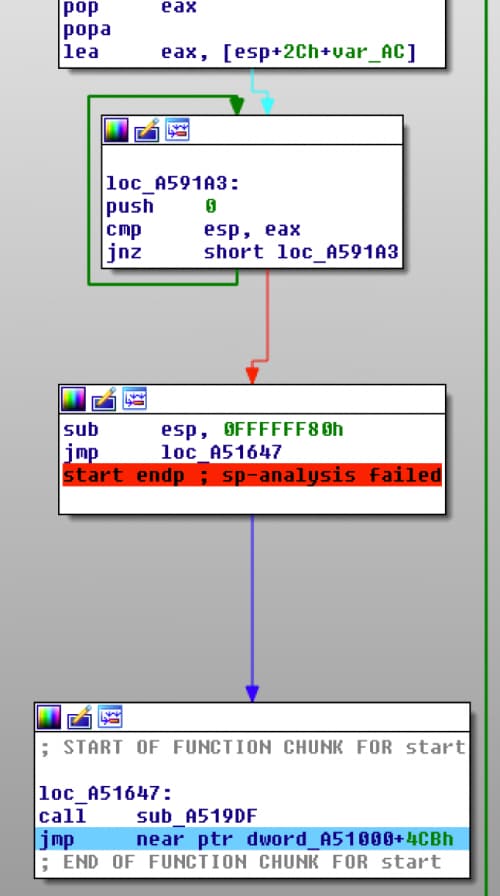
After we hit our breakpoint, we can remove the breakpoint and run until the tail jump that gets us to the original entry point.
popa Instruction Followed by the Tail Jump
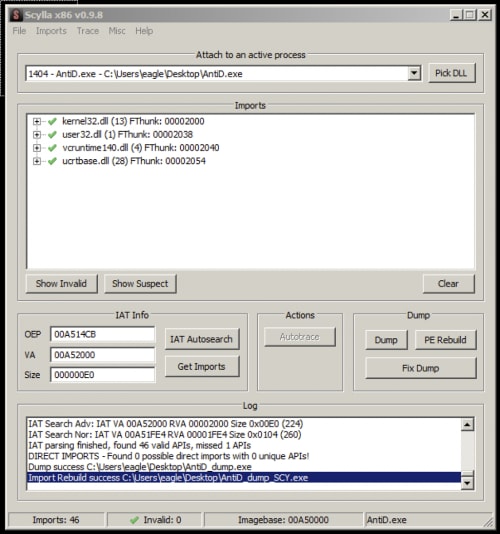
We can take the jump to the unpacked code and then use Scylla with our new found OEP to dump the process.
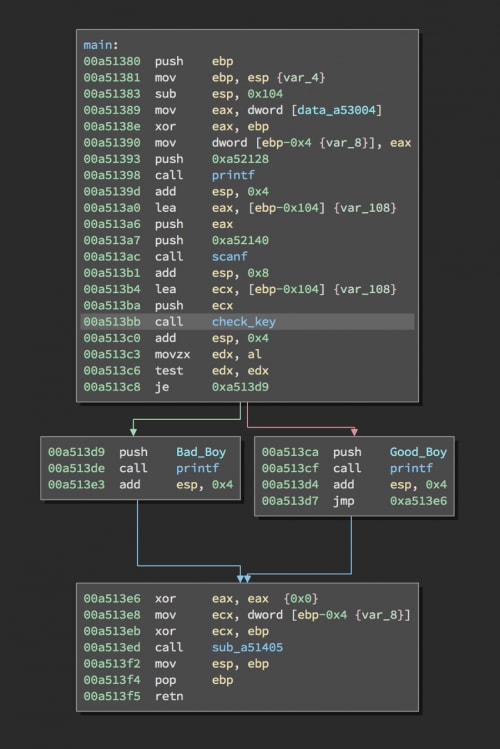
We can open our unpacked executable in Binary Ninja and can see there is a path that prints the good boy message and one that prints the bad boy message. There is a function called right before the branch that checks the key and determines what path we will take.
Main Showing the Good Boy and Bad Boy paths
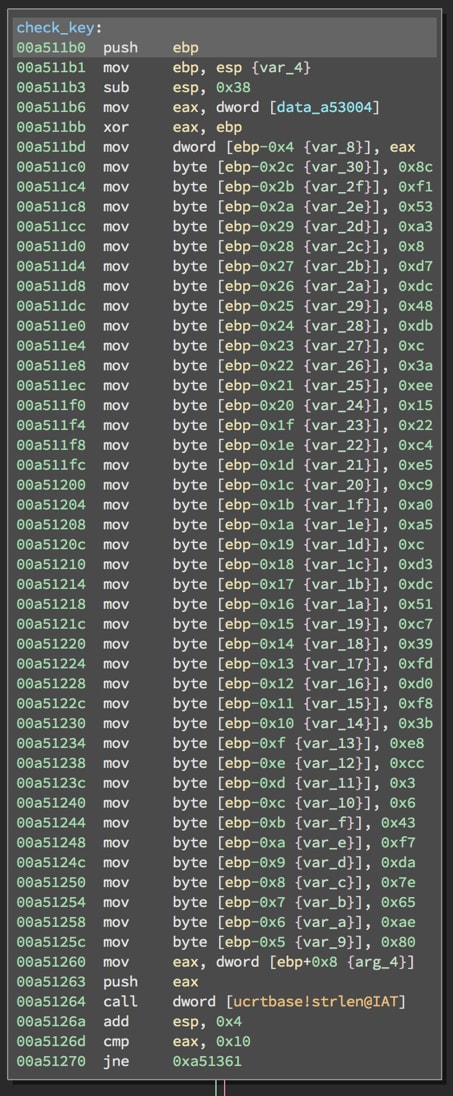
If we look at the function we renamed to check_key, we can see that it moves bytes on to the stack and then checks to see if the input is 16 bytes long.
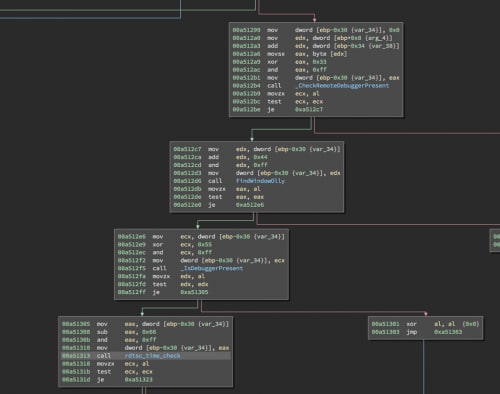
The program then enters a series of anti-debugging checks that will cause the function to return 0 (FALSE) if they are triggered. Before each check, there is also a string encoding operation performed against our string.
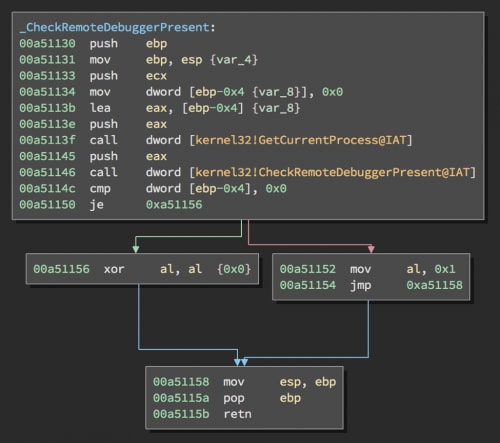
The first anti-debugging check is a call to CheckRemoteDebuggerPresent, which checks to see if the process is being debugged.
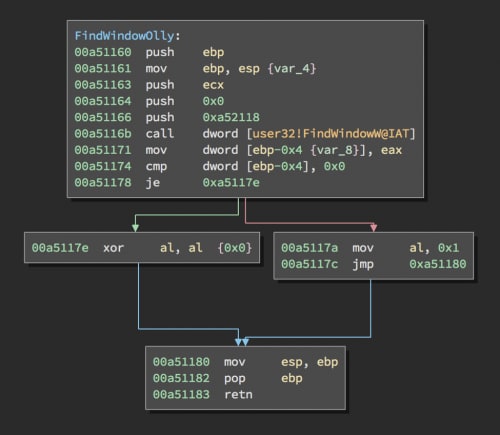
The second anti-debugging check is a call to FindWindowW checking for a Window named OLLYDBG, which is a popular debugger used by analysts.
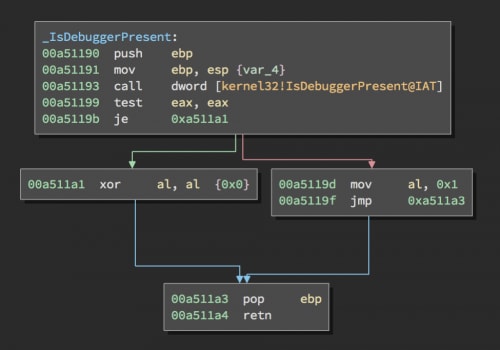
The third anti-debugging check is a call to IsDebuggerPresent, which checks to see if the process is being debugged.
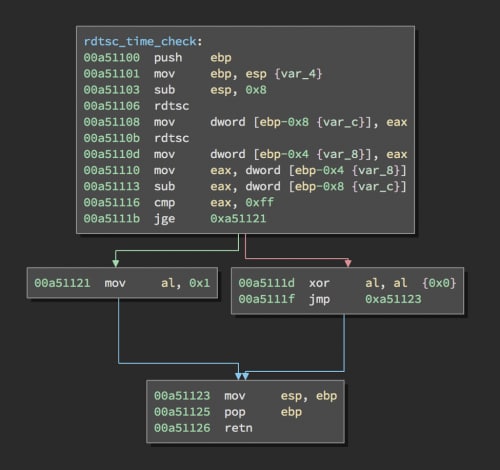
The fourth and final anti-debugging check uses the assembly instruction rdtsc twice as a timing check to see if the process is executing slowly and probably being debugged.
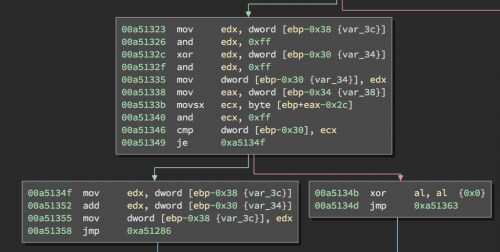
If we pass all the anti-debugging checks, we end up getting the final string operation, which checks the result of all the operations against an offset in the initial buffer of bytes. If they are not equal, the function returns 0 (FALSE). But if they are equal, the result is added, which is used as the XOR key in the final operation.
We can copy off the initial buffer and rewrite the operations in python, so that we can obtain the key.
|
1 2 3 4 5 6 7 8 9 10 11 12 13 14 15 16 17 18 19 20 |
buffer = [0x8C, 0xF1, 0x53, 0xA3, 0x08, 0xD7, 0xDC, 0x48, 0xDB, 0x0C, 0x3A, 0xEE, 0x15, 0x22, 0xC4, 0xE5, 0xC9, 0xA0, 0xA5, 0x0C, 0xD3, 0xDC, 0x51, 0xC7, 0x39, 0xFD, 0xD0, 0xF8, 0x3B, 0xE8, 0xCC, 0x03, 0x06, 0x43, 0xF7, 0xDA, 0x7E, 0x65, 0xAE, 0x80 ] answer = [] c = 0 for i in buffer: for x in range(31, 127): a = (x ^ 0x33) & 0xFF a = (a + 68) & 0xFF a = (a ^ 0x55) & 0xFF a = (a - 102) & 0xFF a = (a ^ (c & 0xFF) & 0xFF) if a == i: answer.append(chr(abs(x))) break c += a print("".join(answer)) |
When we run the script we get the key.
python solve.py
PAN{C0nf1agul4ti0ns_0n_4_J08_W3LL_D0N3!}
Windows 2 Challenge: What does the goat say?
Challenge Created By: Richard Wartell @wartortell
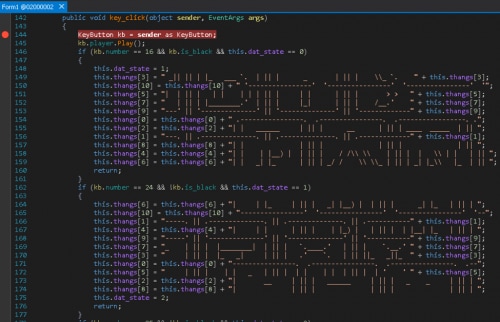
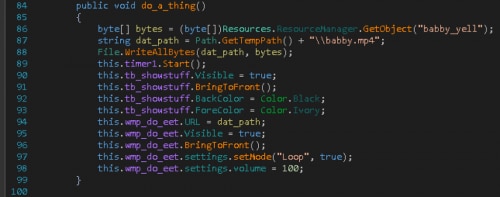
We can open it in dnSpy to decompile and debug. We can see the key_click function looks interesting because it is tracking a state if keys are pressed in a certain order.
The keys are numbered from left to right starting at 0 for the white keys and the same for the black keys. If we press the keys in the correct order do_a_thing() is called.
This function plays a funny David Bowie video while the key scrolls in ascii art behind.
PAN{B4BY_Y3LL5_5O_LOUD!}
Windows 3 Challenge: Gotta keep your Squirtle happy
Challenge Created By: Tyler Halfpop @0xtyh
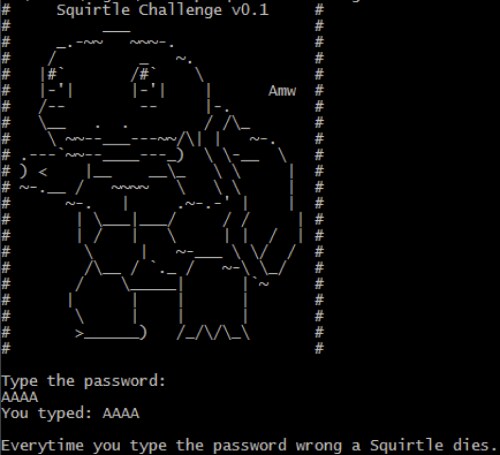
We are given an executable for the Squirtle challenge. When we run the binary we see some ascii art of Squirtle and a check for a password. If we get the password wrong, we sadly find out that we just killed a Squirtle and the program exits.
Dead Squirtle from an Incorrect Password
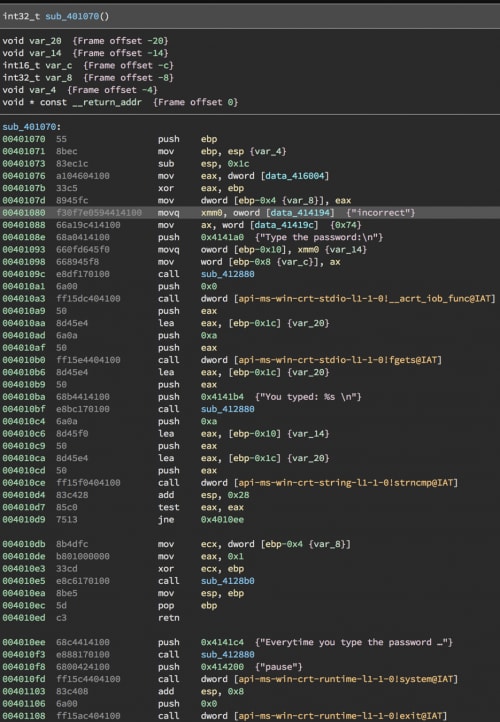
We can open the binary in Binary Ninja and take a look at the main function. If we look at the first branch instruction, there is a function call right before at 401070 that checks the password. We can see that it is just a string compare with the string “incorrect”.
Password Check Function
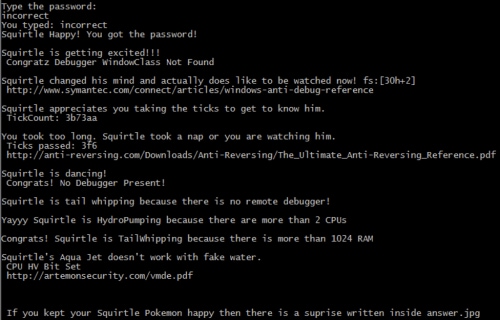
If we type the password correctly we happily find out that we didn’t kill a Squirtle and we get some more output. We have to pass some anti-debugging and anti-vm checks and then we are told that the answer is written in an answer.jpg file.
Correct Password Output
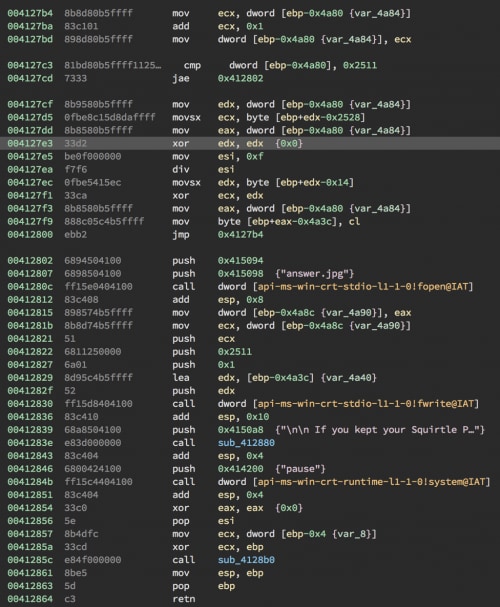
There is an answer.jpg file written after we ran the program, but it is corrupted so we need to figure out how to make the program write it correctly to disk. We can see at the end of the main function there is a loop with a multi-byte XOR key.
XOR Loop Writing the answer.jpg file
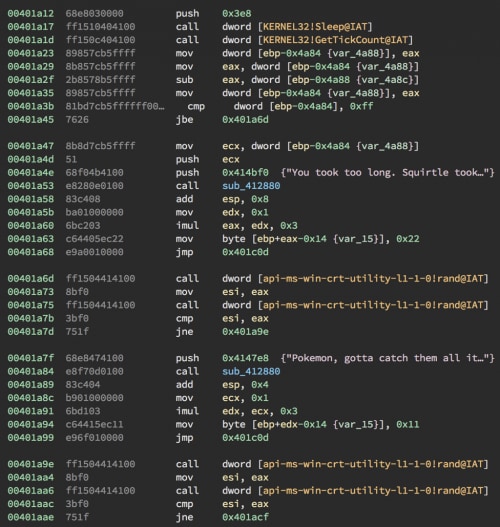
We can assume that if we pass each step we will get the correct key that will output the correct image. At each stage there is a check and then some fake rand() == rand() checks with some funny messages to obfuscate the code. Thankfully there are also helpful hints at each stage if we get stuck or are unsure of the correct path.
Sleep/GetTickCount Check along with fake rand checks
The first check is to see if there is a common debugger window class found.
|
1 2 3 4 5 6 7 8 9 10 11 12 13 14 |
BOOL wdw_class() { HWND hOlly = FindWindow(_T("OLLYDBG"), NULL); HWND hIDA = FindWindow(_T("QWidget"), NULL); HWND hWdbg = FindWindow(_T("WinDbgFrameClass"), NULL); HWND hImm = FindWindow(_T("ID"), NULL); if ((hOlly) || (hIDA) || (hWdbg) || (hImm)) { return TRUE; } return FALSE; } |
The second check is to look at the Process Environment Block at offset fs: [30h+2] to see if the process is being debugged.
|
1 2 3 4 5 6 7 8 9 10 11 12 13 14 15 |
BOOL fs_chk(VOID) { char IsDbgPresent = 0; __asm { mov eax, fs:[30h] mov al, [eax + 2h] mov IsDbgPresent, al } if (IsDbgPresent) { return TRUE; } return FALSE; } |
The third check uses the Windows API GetTickCount() to make sure the system hasn’t been freshly booted.
|
1 2 |
DWORD Counter = GetTickCount(); if (Counter < 0xFFFFF) { |
The fourth check used Sleep along with GetTickCount() and wanted you to bypass the sleep call.
|
1 2 3 4 |
Sleep(1000); DWORD Counter2 = GetTickCount(); Counter2 -= Counter; if (Counter2 > 0xFF) |
The fifth check just used the Windows API IsDebuggerPresent to find out if the process is being debugged. The sixth check similarly called the Windows API CheckRemoteDebuggerPresent to find out if the process was being debugged.
The seventh stage checked to see if there are greater than 2 CPUs.
|
1 2 3 4 5 6 7 8 9 10 |
BOOL cpu_num() { SYSTEM_INFO siSysInfo; GetSystemInfo(&siSysInfo); if (siSysInfo.dwNumberOfProcessors < 2) { return TRUE; } return FALSE; } |
The eighth stage checked to see if there were more than 1024 GB of RAM.
|
1 2 3 4 5 |
MEMORYSTATUSEX statex; statex.dwLength = sizeof(statex); GlobalMemoryStatusEx(&statex); if ((statex.ullTotalPhys / 1024) < 1048576) |
The final check looked to see if the CPU hypervisor bit was set.
|
1 2 3 4 5 6 7 8 9 10 11 12 |
BOOL hv_bit(VOID) { int CPUInfo[4] = { -1 }; __cpuid(CPUInfo, 1); if ((CPUInfo[2] >> 31) & 1) { return TRUE; } return FALSE; } |
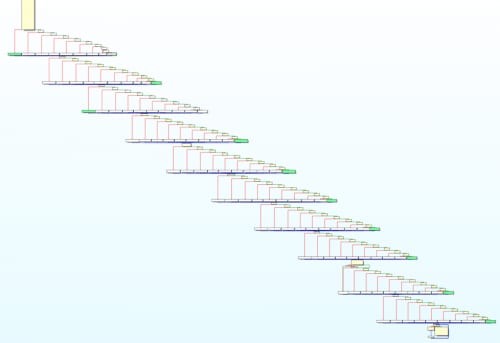
We can step through the program in a binary and make sure the correct path is taken. Then we will get the correct image.
Graph Trace of the Correct Path
We could also get the correct key at each stage and grab the buffer of the XOR’d image and decrypt it with python.
|
1 2 3 4 5 6 7 8 9 10 11 12 13 |
def xor(data, key): l = len(key) return bytearray(( (data[i] ^ key[i % l]) for i in range(0,len(data)) )) data = bytearray(open('xor.jpg', 'rb').read()) key = bytearray([0xAA,0xBB,0xCC,0x11,0x22,0x33,0xEE,0xCC,0x33,0x80,0x2e,0xeb,0xfe,0xff,0xcc]) with open('unxor.jpg', "w") as f: f.write(xor(data, key)) |
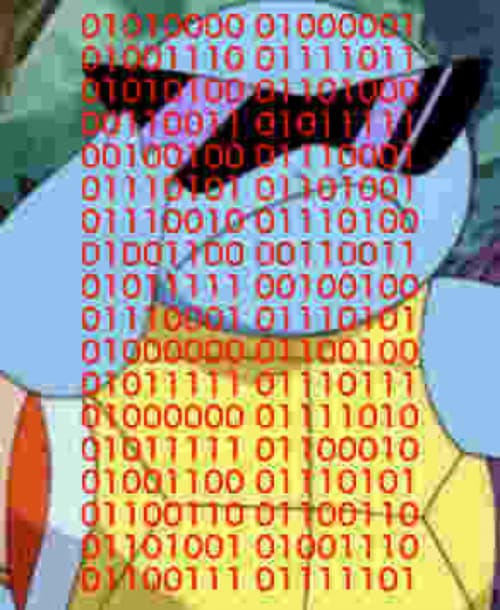
Correct Image
We can finally decode the binary and obtain the key (Sorry :)).
PAN{Th3_$quirtL3_$qu@d_w@z_bLuffiNg}
Windows 4 Challenge: 99 bottles of beer on the wall, 99 bottles of beer. Take one down and pass it around, 98 bottles of beer on the wall. Nah, you need to just pass the jugs of beer around.
Challenge Created By: Jacob Soo @_jsoo_
For this particular challenge, participants were given an x64 binary asking for a valid serial number.
If the serial number is wrong, they should see the image below.
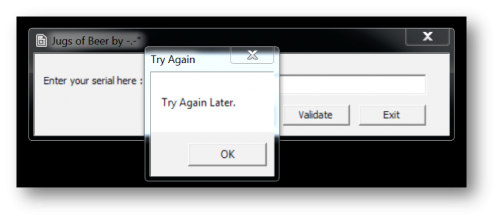
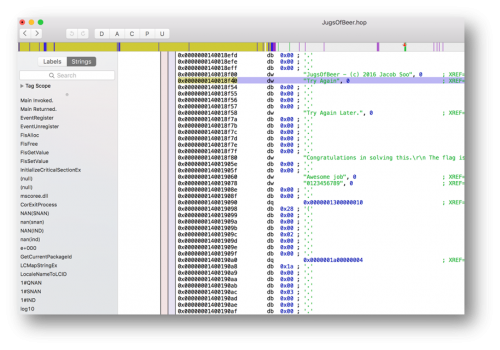
Using Hopper, we found the following strings as indicated in the image below.
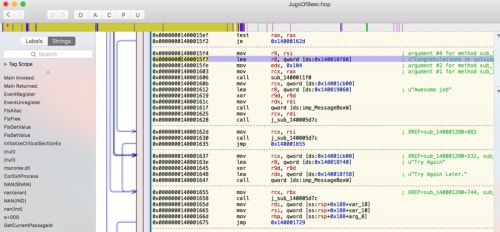
So let’s pick one of the “strings” and see where it was referenced.
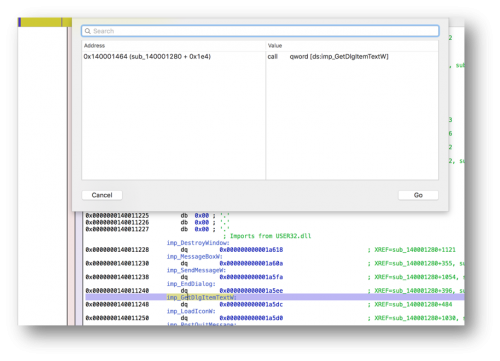
Ok, let’s try and see whether we can find any GetDlgItemText/GetDlgItemTextW API calls. Ok, it seems like we got one at 140001464.
If we step debug it and follow the flow, we will come across a string length check at 1400014b3. Now we know that the input string must be 32 characters in length.
Stepping through again, at 140001500 we will encounter a check to ensure that the input characters must be 1, 2 or 3. This makes sure that the serial for this challenge is only comprised of 1, 2 and 3.
If we were to analyze the application at 140001750, we can see that there is an array with an initial capacity of [0, 13, 7]. However the maximum capacity of the “jugs” is [19, 13, 7] and the expected end state is having the array be [10, 10, 0]. You basically have three “jugs” with a size of 7, 13 and 19. The 7 and 13 size “jugs” are filled and the container with size 19 is empty. What you need is 10 in two of the containers (13 and 19).
Let’s re-write it in pseudo codes. Let’s assume that 3 “jugs” are under the array, M and the 3 jugs are a,b and c.
|
1 2 3 4 5 6 7 8 9 10 11 12 13 14 15 16 17 18 19 20 21 22 23 24 |
for (int i = 0; i < szSerial.Length; i += 2){ a = convert_it_to_int(Substring_of_szSerial(i, 1)); b = convert_it_to_int (Substring_of_szSerial (i + 1, 1)); if (a != b){ switch (b){ case 1: c = 19; break; case 2: c = 13; break; case 3: c = 7; break; } if ((M[b] + M[a]) > c){ M[a] += M[b] - c; L[b] = c; }else{ M[b] += L[a]; M[a] = 0; } } } |
At first it may seem to be very confusing what is actually going on here. But let’s take a closer look.
This is the limit of the jugs.
|
1 2 3 4 5 6 7 8 9 10 |
Limit: 19 13 7 ----------------------- A B C Jug: 1 | 2 | 3 Water: 0 | 13 | 7 If [B] +[A] > Limit-of-[A] Fill [B] and put the remaining in [A] Else Fill [B] and clear [A] |
Now in the serial, if we were to start with 31, it simply means to fill up jug C to jug A.
So the aim of this is to move around the “beer” so jug A == 10 and jug B == 10.
We would have realized that this is the classic “Liquid Pouring Puzzle” that some, if not most of us, have seen while we were in school.
You can write your tool based on the findings. But if we were to do it with pen and paper. We should get something like the one below.
0-13-7
7-13-0
19-1-0
12-1-7
12-8-0
5-8-7
5-13-2
18-0-2
18-2-0
11-2-7
11-9-0
4-9-7
4-13-3
17-0-3
17-3-0
10-3-7
10-10-0
Rewriting this to serial code: 31211332133221321332133221321332
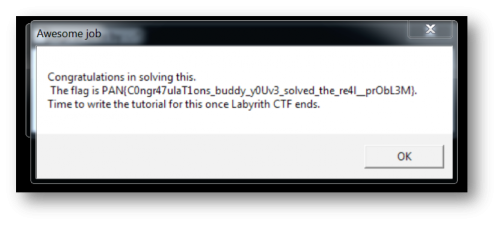
Using that as the serial, we will solve it and get this message back.
PAN{C0ngr47ulaT1onsbuddyy0Uv3solvedthere4l_prObL3M}
Windows 5 Challenge: Pick your favorite decimal code.
Challenge Created By: Jacob Soo @_jsoo_
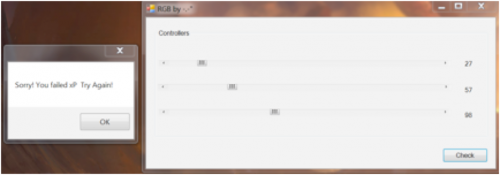
Upon running RGB.exe, we’re presented with three sliders, presumably corresponding to the RBG colors, and once you’ve set their values you can check them. This indicates that we’ll need to figure out the correct three values to access the key.
Wrong values
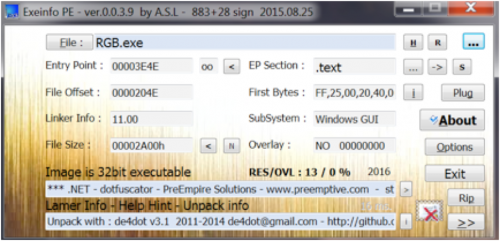
A quick look at the PE file with Exeinfo shows that it’s a .NET program, which can be unpacked with de4dot.
Checking binary type
Running de4dot against the executable creates a new file, “RGB-cleaned.exe” that we can then decompile with dnSpy to look at the underlying source code.
Deobfuscating binary
When looking at the source code, we come to the challenge that we’ll need to solve.
Algorithm
Simply put, three conditions need to be met to get the MessageBox we want to display. At this point, I started poking around to see if I can just modify the code so it always prints the answer, but when you start diving into the functions being called, you can see there is a bit more going on and requires the actual numbers.
XORing numbers against array of numbers
So I decided to tackle the math aspect instead.
The three conditions that need to be met are that one equation result must equal another equation result and one of the specific values needs to be over 60. I opt to brute force it by iterating through every possible combination of numbers, knowing that each slider will be in a range of 1-255, with one being in the range of 60-255. This gives us roughly 12.5 million possibilities, 255*255*(255-60), which shouldn’t take long at all.
After a few minutes of thinking through the logic, I use the below script to find the value.
|
1 2 3 4 5 6 7 8 9 10 11 12 13 14 15 16 17 18 19 20 21 22 23 24 25 26 27 28 29 30 31 32 33 34 35 36 37 38 39 40 41 42 43 44 45 |
-----rgb.py import sys def func1(value, value2, value3, num, num2): result = value + num - value2 + value * value * value2 - value3 return result def func2(value, value2, value3, num, num2): result = value2 * (value3 * 34 + (num2 - value)) + 3744 return result def check(value, value2, value3, num, num2): a = func1(value, value2, value3, num, num2) b = func2(value, value2, value3, num, num2) if a == b: print "\nwinner winner, chicken dinner!\n\n", value, value2, value3, " [" + str(a), str(b) + "]" sys.exit(1) return value = 60 value2 = 0 value3 = 0 num = value2 * value3 num2 = value * 3 while value < 256: value2 = 0 value3 = 0 num = value2 * value3 num2 = value * 3 check(value, value2, value3, num, num2) while value2 < 256: value3 = 0 num = value2 * value3 num2 = value * 3 check(value, value2, value3, num, num2) while value3 < 256: num = value2 * value3 num2 = value * 3 check(value, value2, value3, num, num2) value3 += 1 value2 += 1 value += 1 ----- |
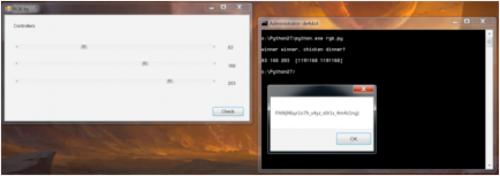
Within a few seconds, we have the answer and can validate it within RGB.exe to get the key.
83 168 203
PAN{l4byr1n7h_s4yz_x0r1s_4m4z1ng}
Windows 6 Challenge: Discover the key in the shellC0DE to rescue the Princess!
Created By: Josh Grunzweig @jgrunzweig
Opening up this Windows executable quickly reveals that we’re working with some shellcode. If this wasn’t apparent, the clue provided gave some hints as to what you’d be dealing with.
Discover the key in the sh>E11C0DE to rescue the Princess!
@jgrunzweig
To make things easier for challengers, I went ahead and compiled the shellcode into a working executable, versus simply giving you the raw shellcode bytes. Once opened we see that there are no imports and only seven functions.
Figure 1 Functions in shellcode and import table
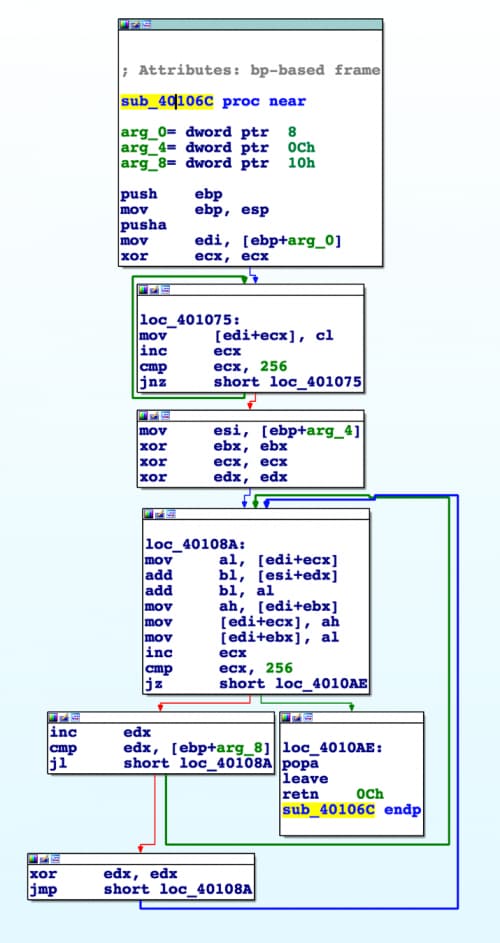
Without even debugging this shellcode we can quickly scan the seven functions provided to see if anything jumps out. Sure enough, we quickly identify a function that is almost certainly RC4 at 0x40106C. The two loops iterating 256 times gives us a big hint. Working through this function, we can confirm it is in fact RC4.
Figure 2 RC4 function
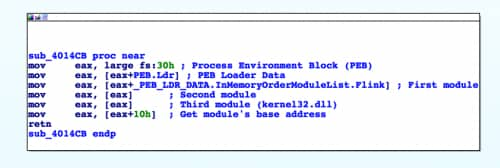
We also identify a very small function which starts by loading fs:0x30, which should get a reverser’s attention fairly quickly. For those unaware, fs:0x30 points to the Process Environment Block (PEB), which holds a wealth of information. This function in question is specifically looking at the PEB’s LoaderData offset, which holds information about the loaded modules in the process. We then get the third loaded module, which is kernel32.dll, and grab this DLL’s base address (offset 0x10). This function is essentially grabbing the base address of kernel32.dll, which is most likely going to be used to load further functions.
Figure 3 Function getting kernel32 base address
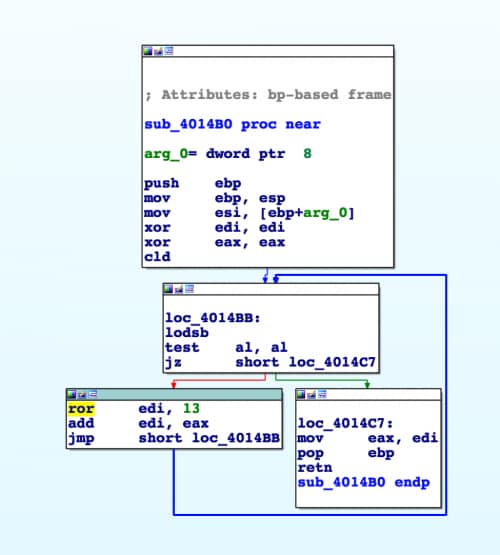
We continue to identify yet another function that appears to be hashing data, as evident by the ROR13 call.
Figure 4 Possibly hashing function
At this point, let’s start stepping through our shellcode in a debugger. We quickly see multiple calls to our function that got kernel32’s base address, followed by another function that takes this base address and a DWORD as arguments. Looking through this function we see it walking through all of kernel32’s exported functions, hashing the name, and comparing it against the provided DWORD. This is a simple shellcode trick that will allow attackers to obfuscate what functions are being loaded by the malware when viewed statically. There are a few ways we can approach this. We can debug the code and rename as we encounter them. Alternatively, we can simply search for the hashes on Google. Since the ROR13 technique is so common, there are many places online that have documented these hashes, like this one.
After getting over this minor hurdle we can start to see what the code is doing to understand what it’s looking for. Looking at the code in detail, we can see that it’s building a buffer of 54 bytes and attempting to decode it against a key that is generated using RC4. In the event the key starts with ‘PAN{‘, it will display it in a messagebox dialog window.
The key is generated using a number of variables that are pulled from the machine it is running on. The first four bytes of the key are a static value of ‘b00!’. Following this, the code looks for the following data:
- Current month plus 0x2D
- Current day plus 0x5E
- Current hour plus 0x42
- The operating system major version plus 0x3C
- The operating system minor version plus 0x3F
- The isDebugged flag, which is pulled from the PEB, plus 0x69
- The language version plus 0x5E
These values together give us a key that is eleven bytes long. With only that information, it would be very difficult to brute force. However, since we know how each byte in the key is generated, we can limit our key space for the brute force and hopefully determine what the malware is looking for.
Knowing that there are only 12 months in a year, we can assume the first generated byte is in the range between 1 and 12. Similarly, there are a maximum of 31 days in a month, giving our second byte a range of 1 to 31. We continue this pattern on the rest of the bytes in the RC4 key. Most people looked to have the most trouble limiting the key space on the operating system versions, and the language version. Fortunately, there are very few legimate operating system (OS) versions overall. The major OS version will have a value of either 5, 6, or 10. The minor OS version will have a value of 0, 1, 2, or 3.
For the language version, there is a check early on in the execution flow where the result of GetUserDefaultUILanguage has its primary language identifier verified to be 0x0, or LANG_NEUTRAL. Knowing this, we can limit the possibilities of to values of 0x0, 0x04, 0x08, 0x0c, 0x10, or 0x14.
Using all of this information, we can generate a brute-forcing script such as the following.
|
1 2 3 4 5 6 7 8 9 10 11 12 13 14 15 16 17 18 19 20 21 22 23 24 25 26 27 28 29 30 31 32 33 34 35 36 37 38 39 40 41 42 43 44 45 46 47 48 49 50 51 52 53 54 55 |
import sys from datetime import datetime startTime = datetime.now() def rc4_crypt( data , key ): S = range(256) j = 0 out = [] for i in range(256): j = (j + S[i] + ord( key[i % len(key)] )) % 256 S[i] , S[j] = S[j] , S[i] i = j = 0 for char in data: i = ( i + 1 ) % 256 j = ( j + S[i] ) % 256 S[i] , S[j] = S[j] , S[i] out.append(chr(ord(char) ^ S[(S[i] + S[j]) % 256])) return ''.join(out) c = 0 for current_month in range(1, 13): for current_day in range(1, 32): for current_hour in range(1, 25): for os_major_version in [5, 6, 10]: for os_minor_version in [0, 1, 2, 3]: for peb_isdebugged_flag in [0, 1]: for language_version in [0x0, 0x04, 0x08, 0x0c, 0x10, 0x14]: key = 'b00!' + chr(current_month+0x2d) + chr(current_day+0x5e) + chr(current_hour+0x42) + chr(os_major_version+0x3c) + chr(os_minor_version+0x3f) + chr(peb_isdebugged_flag+0x69) + chr(language_version+0x5e) x = rc4_crypt('\xba\xafMU<\xe3\x03"\xb0\xdf\xf3\xd3W\xd0\xe1@\xf9\x1 3\x1f\xba\x8d\x12\xf1\xffH\xc2\x8e\x00\xfdT\x97\x9duq0\x8fC(\xfe i6G\x8f\xa2\xefIt|\xe1LoO\xd4\x82', key) if x[0:4] == 'PAN{': print "Winner winner, chicken dinner:", x print "Month: {}".format(current_month) print "Day: {}".format(current_day) print "Hour: {}".format(current_hour) print "OS Major Version: {}".format(os_major_version) print "OS Minor Version: {}".format(os_minor_version) print "Debugged: {}".format(peb_isdebugged_flag) print "Language Version: {}".format(language_version) print "Time taken:", datetime.now() - startTime sys.exit(1) c+=1 if c % 100000 == 0: print '%d attempts made.' % c print "Time taken:", datetime.now() - startTime |
After running the script for roughly 3 minutes, we are presented with the following:
|
1 2 3 4 5 6 7 8 9 10 11 12 13 14 15 16 17 18 19 20 21 |
100000 attempts made. 200000 attempts made. 300000 attempts made. 400000 attempts made. 500000 attempts made. 600000 attempts made. 700000 attempts made. 800000 attempts made. 900000 attempts made. 1000000 attempts made. 1100000 attempts made. 1200000 attempts made. Winner winner, chicken dinner: PAN{th0se_puPP3ts_creeped_m3_out_and_I_h4d_NIGHTMARES} Month: 12 Day: 13 Hour: 10 OS Major Version: 5 OS Minor Version: 1 Debugged: 1 Language Version: 8 Time taken: 0:03:04.102476 |
PAN{th0se_puPP3ts_creeped_m3_out_and_I_h4d_NIGHTMARES}
Leave a comment below to share your thoughts about these challenges. Be sure to also check out how other threat researchers solved these challenges:
Windows 1:
- https://jmprsp.wordpress.com/2016/08/31/labyrenth-windows-track-challenge-1/
- https://github.com/gray-panda/grayrepo/tree/master/2016_labyREnth/win1_antid
- http://www.ghettoforensics.com/2016/08/running-labyrenth-unit-42-ctf.html
- https://github.com/nullsector/ctf/tree/master/PANLabyREnthCTF/Windows/1/AntiD
- https://github.com/uafio/git/blob/master/scripts/labyREnth-2016/labyrenth-2016-win-1.py
- https://github.com/11x256/CTFs/tree/master/2016/LabyREnth/1-AntiD
- https://github.com/spartansecurity/Writeups/blob/master/labyrenth2016/windows.md#challenge-1
- http://chrisbedev.blogspot.com/2016/08/labyrenth-ctf.html
Windows 2:
- https://jmprsp.wordpress.com/2016/08/31/labyrenth-ctf-windows-track-challenge-2/
- https://github.com/gray-panda/grayrepo/tree/master/2016_labyREnth/win2_babbysays
- https://github.com/nullsector/ctf/tree/master/PANLabyREnthCTF/Windows/2
- https://github.com/11x256/CTFs/tree/master/2016/LabyREnth/2-BabbySay
- https://github.com/spartansecurity/Writeups/blob/master/labyrenth2016/windows.md#challenge-2
Windows 3:
- https://jmprsp.wordpress.com/2016/09/03/labyrenth-ctf-windows-track-challenge-3/
- https://github.com/gray-panda/grayrepo/tree/master/2016_labyREnth/win3_squirtle
- https://github.com/nullsector/ctf/tree/master/PANLabyREnthCTF/Windows/3/Squirtle
- https://github.com/11x256/CTFs/tree/master/2016/LabyREnth/3-Squirtle
- https://github.com/spartansecurity/Writeups/blob/master/labyrenth2016/windows.md#challenge-3
Windows 4:
- https://jmprsp.wordpress.com/2016/09/04/labyrenth-ctf-windows-track-challenge-4/
- https://github.com/gray-panda/grayrepo/tree/master/2016_labyREnth/win4_jugsofbeer
- http://www.ghettoforensics.com/2016/08/running-labyrenth-unit-42-ctf.html
- http://sibears.ru/labs/labyrenth2016-win-4/
- https://github.com/nullsector/ctf/tree/master/PANLabyREnthCTF/Windows/4/JugsofBeer
- https://github.com/uafio/git/blob/master/scripts/labyREnth-2016/labyrenth-2016-win-4.py
- https://github.com/11x256/CTFs/tree/master/2016/LabyREnth/4-JugsofBeer
- https://github.com/spartansecurity/Writeups/blob/master/labyrenth2016/windows.md#challenge-4
Windows 5:
- https://jmprsp.wordpress.com/2016/09/04/labyrenth-ctf-windows-track-challenge-5/
- https://github.com/gray-panda/grayrepo/tree/master/2016_labyREnth/win5_rgb
- https://github.com/nullsector/ctf/tree/master/PANLabyREnthCTF/Windows/5/RGB
- https://github.com/uafio/git/blob/master/scripts/labyREnth-2016/labyrenth-2016-win-5.py
- https://github.com/11x256/CTFs/tree/master/2016/LabyREnth/5-RGB
- https://github.com/spartansecurity/Writeups/blob/master/labyrenth2016/windows.md#challenge-5
Windows 6:
- https://jmprsp.wordpress.com/2016/09/07/labyrenth-ctf-windows-track-challenge-6/
- https://github.com/gray-panda/grayrepo/tree/master/2016_labyREnth/win6_shellcode
- https://github.com/uafio/git/blob/master/scripts/labyREnth-2016/labyrenth-2016-win-6.py
- https://github.com/11x256/CTFs/tree/master/2016/LabyREnth/6-Shellcode
- https://github.com/spartansecurity/Writeups/blob/master/labyrenth2016/windows.md#challenge-6
