This post is also available in: 日本語 (Japanese)

At Ignite '19, Vidya Gopalakrishnan, SOC Engineer, and Matt Mellen, Sr. SOC Manager, will be giving attendees a rare glimpse into the Palo Alto Networks Security Operations Center (SOC). They’ll shed light on our overall strategy as well as how Cortex XDR has helped automate and enhance a tier-less security operating model. Palo Alto Networks has the benefit of being our own "customer zero" for all new Palo Alto Networks products, allowing us to make product improvements and develop best practices while keeping our security team on the cutting edge of technology. While Cortex XDR adds intelligence and efficiency into all three key functions of security operations – alert triage, incident investigation/response, and threat hunting – Vidya and Matt will be focusing specifically on how they have been using it for threat hunting, the area in which companies usually have the fewest available resources.
Here’s an exclusive preview of how we’ve used Cortex XDR to hunt, identify, and remediate a piece of persistent malware.
How to hunt for persistent malware
The Mitre Att&ck framework describes “persistence” as an action or config change that allows an adversary to maintain access to a system despite restarts, credential loss, or other interruptions. There are many techniques by which malware can achieve persistence; one common tactic is to change registry “run” keys, which causes a program to be executed every time a user logs in. Sounds relatively simple to identify, right? But capturing the different techniques without getting tripped up by false positives is not an easy feat without the right tools and processes.
Step 1: Search
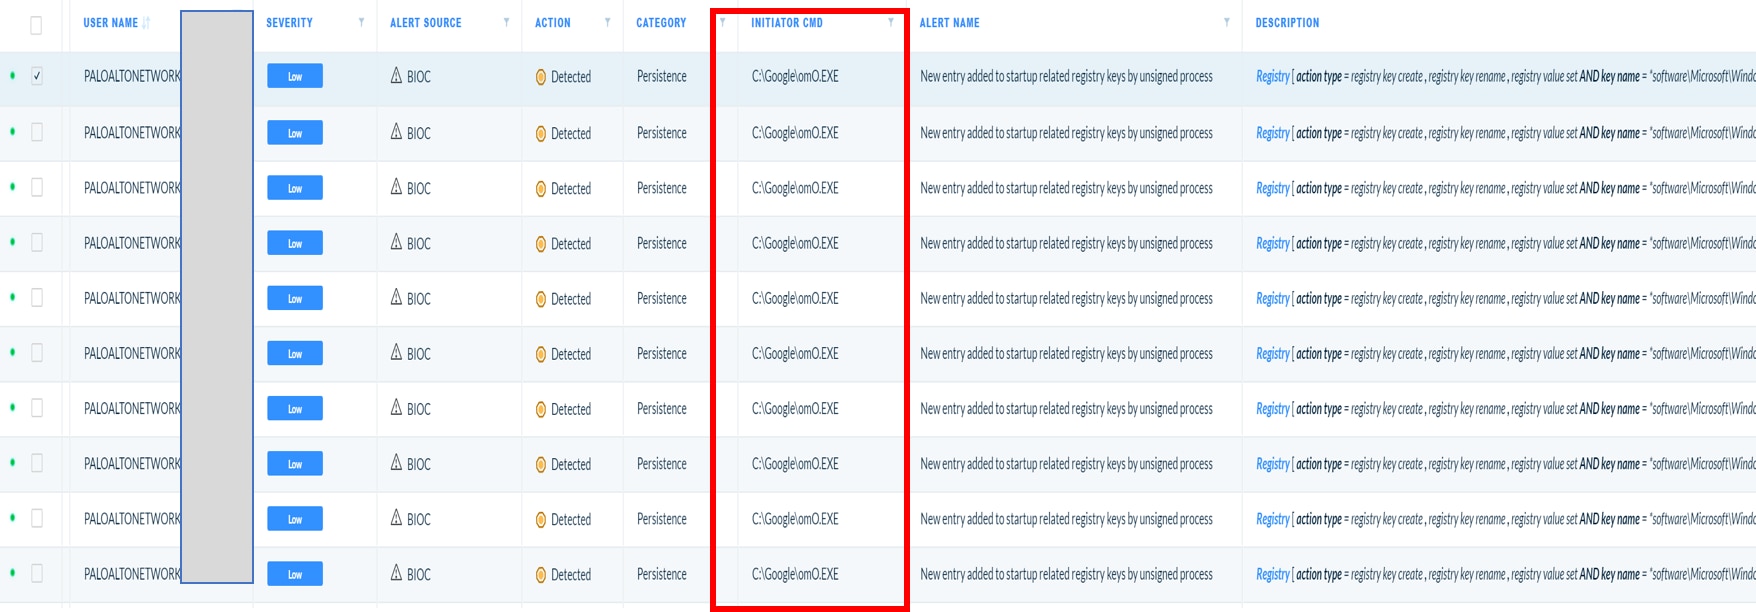
Cortex XDR comes pre-configured with an array of known behavior-based indicators of compromise (BIOCs). These BIOCs are rules that identify interesting or malicious behaviors based on tactics, techniques and procedures – rather than the easily evaded artifacts typically used in IOC hunting. The first step is to search for alerts with the category of “Persistence,” and set the alert source as “BIOCs.” In this case, we’re targeting BIOCs that accompany typical persistence behavior, such as registry keys that have been written over or added to the registry by an unsigned process.
Step 2: Find what stands out
The search generates a list of events. Duplicate results from a large number of hosts generally indicates normal behavior; they can be removed. Several, however, show an executable from a suspicious path. C:/Google is definitely not a normal folder path, and the filename (oMO.exe) is also unusual.
Step 3: Triage and Validate
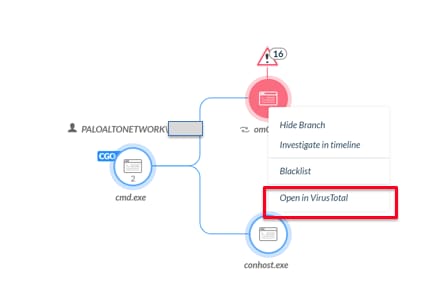
Selecting any one of these events, we click “Analyze” to see the chain of events (or causality). We can see that Cortex XDR identifies the root cause as cmd.exe from which everything was spawned. In the below screenshot, oMO.exe is identified as malware, which is why it shows up in red. If needed, additional information can be obtained from knowledge bases such as AutoFocus and VirusTotal with a simple right-click. The number of BIOC alerts (16) indicates that this event requires further investigation using the EDR events collected for omO.exe and the rest of the causality.
Step 4: Investigate
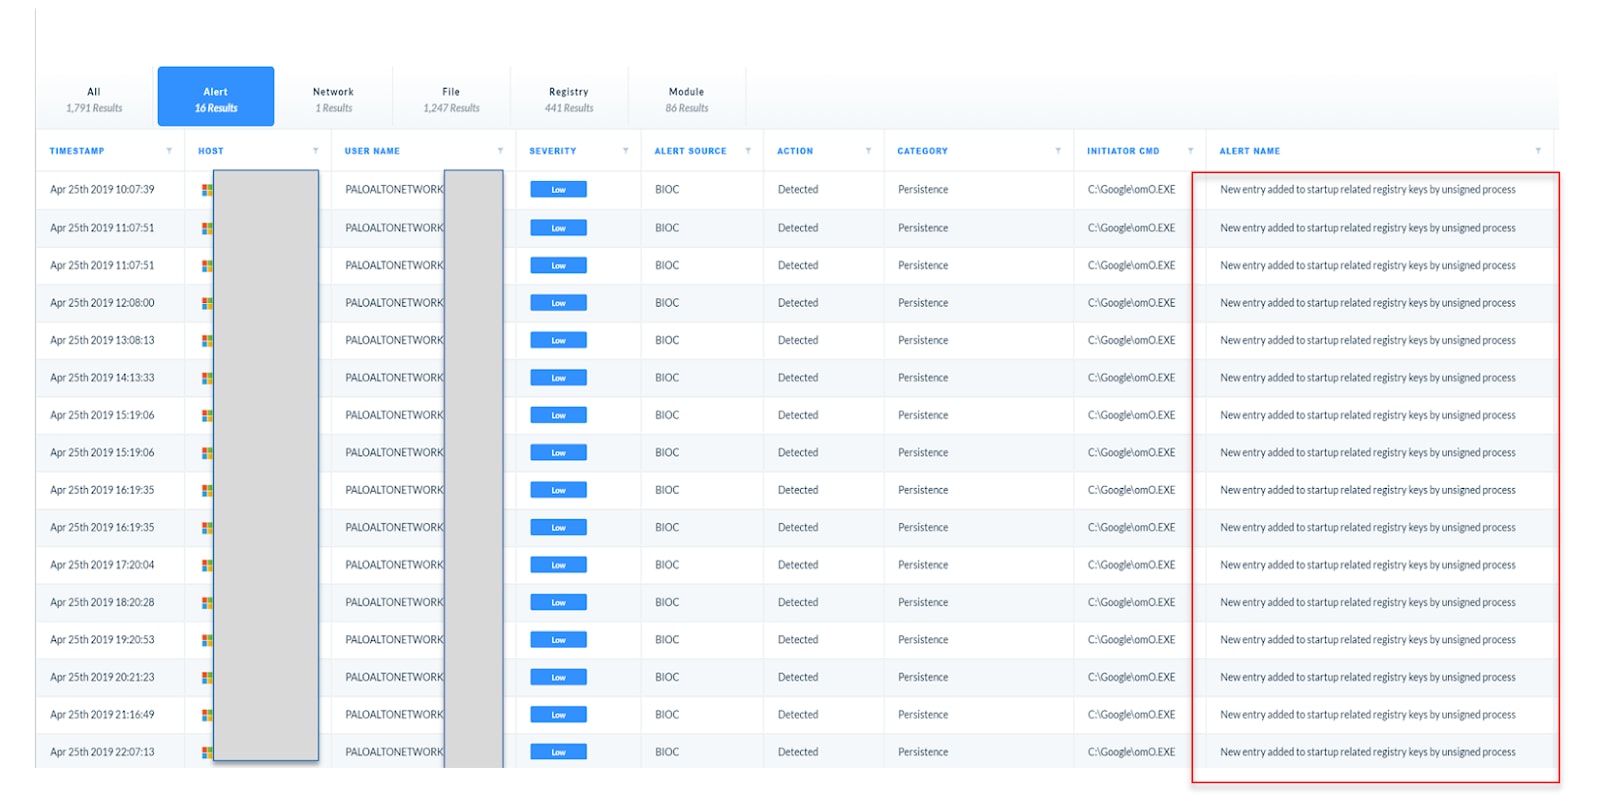
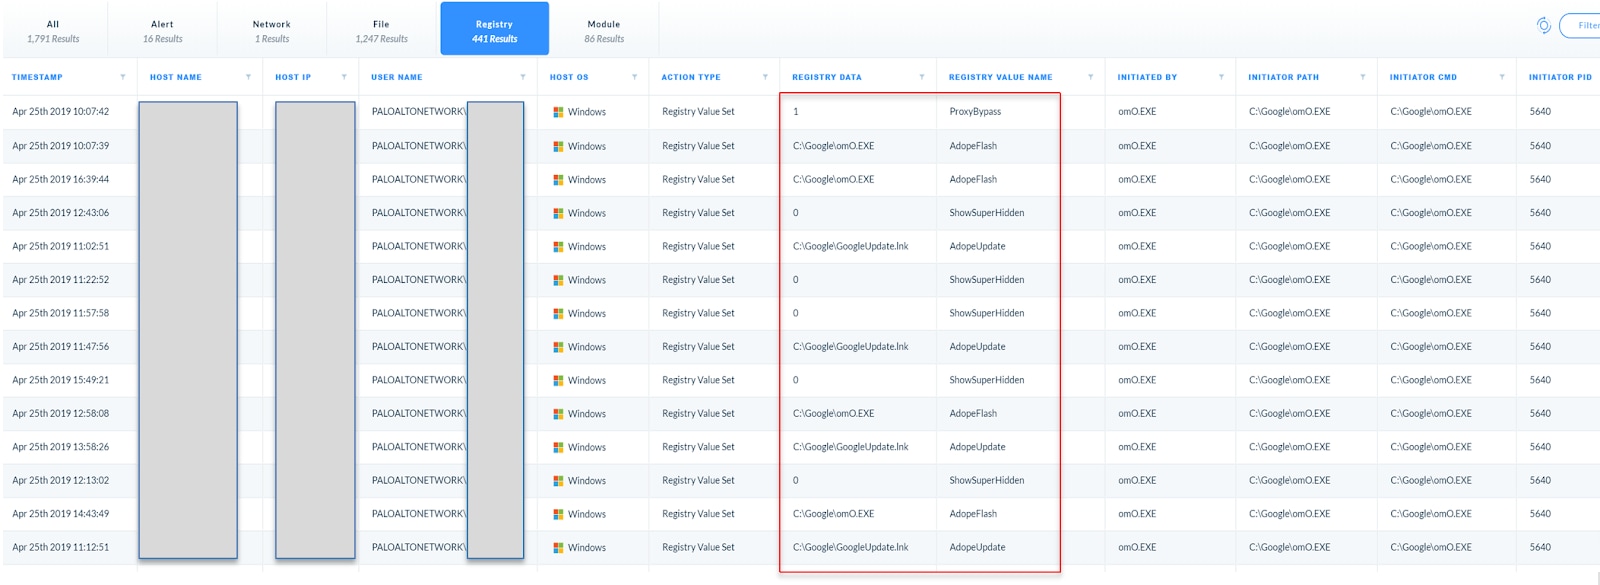
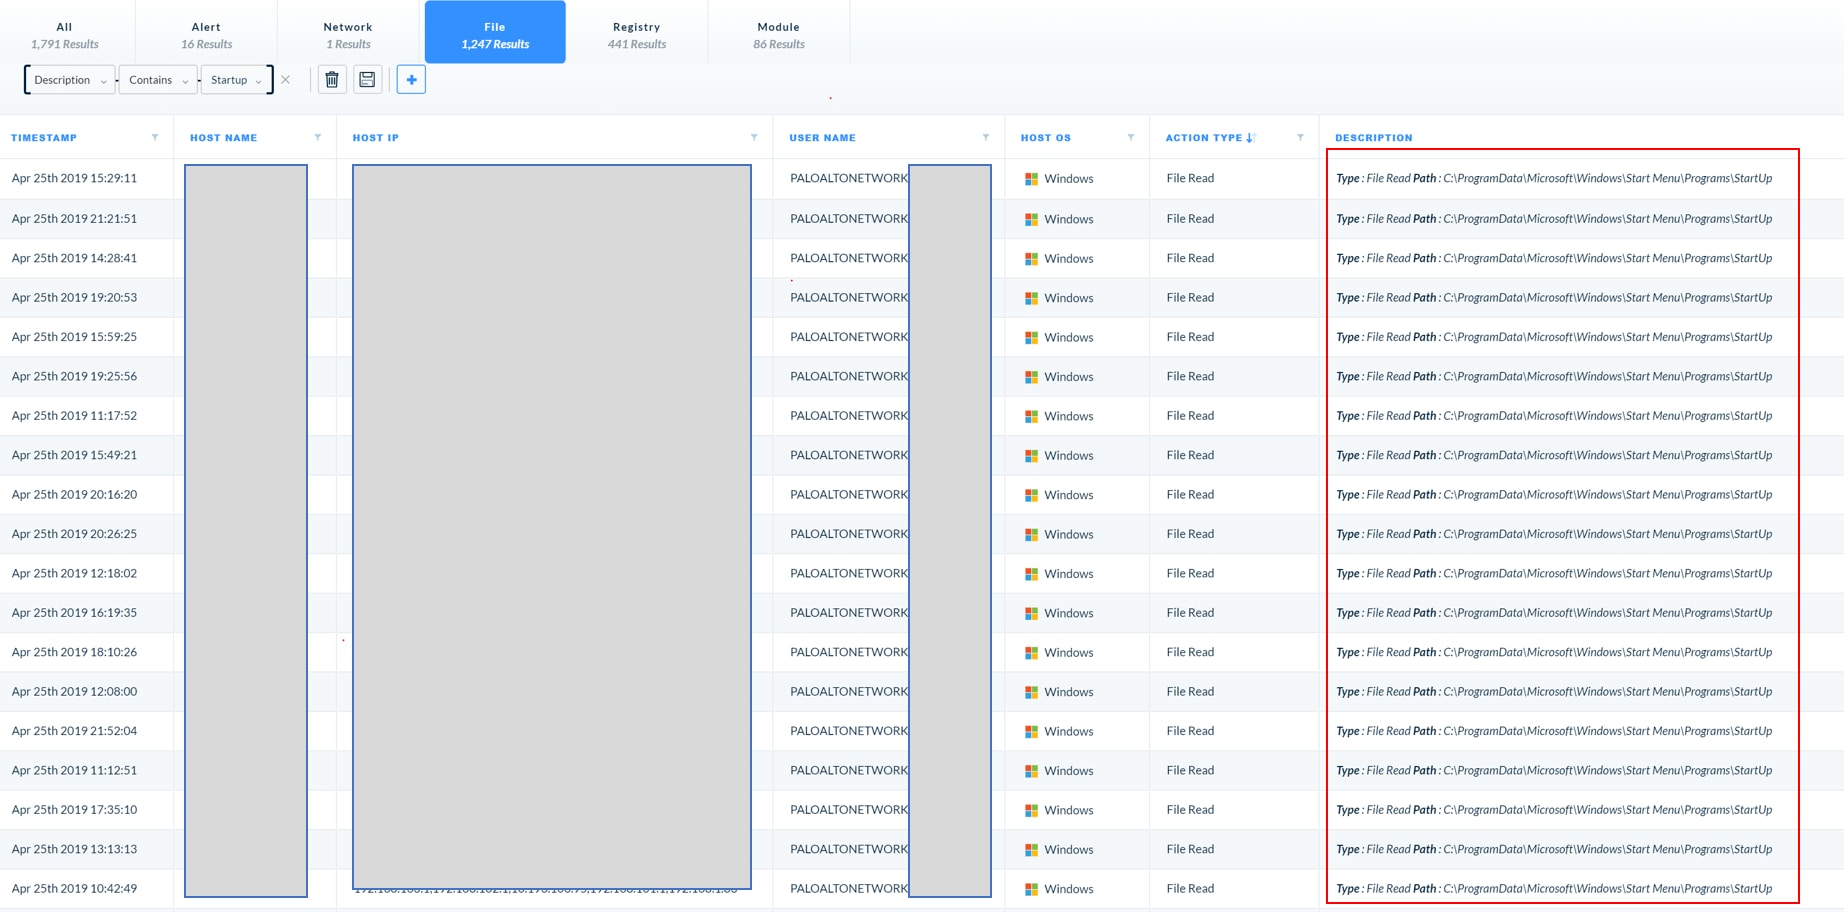
For further investigation, we have the option to click into several tabs revealing the forensic detail used to confirm that this is indeed malware. In these tabs, we find evidence across various types of endpoint behaviors. In the Alerts Tab, we find that the Persistence BIOC fired for the same machine 16 times. Furthermore, we can investigate the associated endpoint and network behaviors from the other tabs.
Looking through these tabs, we find:
1. Registry tampering visible on the registry tab.
2. A suspicious connection to a random GoDaddy site visible on the Network tab.
3. Repetitive file reads that show the malware reading itself from the startup menu on the File tab.
Each of these is typical of persistence behavior.
If you’re not a forensic specialist, this information can be a lot to take in, but Cortex XDR simplifies the known bad activity into contextual alerts so less experienced analysts can also perform fast and accurate investigations. This kind of information not only further confirms that this is malware but can also provide visibility into how much of our infrastructure this piece of malware may have infiltrated, to help assess the scope of damage.
Step 5: Remediate
Now that we’re clear that this is malicious activity, we take action. We first issue a reimage of the system given that it was affected by malware. We then blacklist the malware, preventing execution on endpoints, and do the same for the “bad domain,” blocking transmission through network and cloud protection points. This, in turn, updates Wildfire where the malicious entities will be confirmed. The prevention signatures will automatically be updated on Traps and pushed to all of our global customers, thereby enabling future prevention of a malware sample that the environment has not previously seen.
Step 6: Breathe
That’s it – the world is now a slightly safer place.
Within a few clicks, Cortex XDR has simplified a legacy threat hunting process that is so cumbersome that companies often can’t get to it, which contributes to industry statistics such as a mean-time-to-identify of 197 days.
Persistent malware is one example of structured data hunting, which is performed based on predefined behaviors that generate alerts. At Ignite, Vidya and Matt will also be sharing use cases of Cortex XDR for unstructured data hunting, using robust machine learning capabilities to find anomalies across hundreds of data dimensions. These are the types of threats that are even harder to identify using legacy approaches.
To learn more, catch the “‘Stand and Still’ Hunting with Cortex XDR” session on June 3rd at Ignite USA. If you can’t make it to Austin but would like to see more of Cortex XDR in action, click here to request a demo.

